
Popular Posts


🛠️ How to Install Laminate Flooring (Step-by-Step Guide)
🛠️ How to Install Laminate Flooring (Step-by-Step Guide)
🛠️ How to Install
Laminate Flooring (Step-by-Step Guide)
Laminate flooring is one of the most popular choices for
homeowners, renters, and DIYers. It’s affordable, durable, and stylish,
and best of all, it’s relatively easy to install—even for beginners.
Whether you're a student looking to update your room,
a job seeker upgrading your space, or an employee wanting to refresh
your home office, this guide will walk you through the process of
installing laminate flooring like a pro.
📦 What You'll Need Before
You Begin
Tools & Materials:
- Laminate
flooring planks
- Underlayment
(if not pre-attached)
- Spacers
- Measuring
tape
- Utility
knife or laminate cutter
- Hammer
& tapping block
- Pull
bar
- Level
- Pencil
or chalk
- Safety
gear (gloves, knee pads, goggles)
What is SAP Landscape?
🧩 Step-by-Step: How to
Install Laminate Flooring
Step 1: Prepare the Surface
- Clean
and level the floor – Remove old flooring, nails, and debris.
- Make
sure the subfloor is dry, clean, and even.
- Repair
any bumps or dips to ensure a smooth installation.
Step 2: Acclimate the Laminate
- Let
the laminate planks sit in the room for 48 hours.
- This
allows them to adjust to the room’s temperature and humidity, reducing the
risk of expansion or shrinkage.
Step 3: Install Underlayment
- Roll
out the underlayment and tape the seams.
- If
your laminate has underlayment attached, you can skip this step.
- Underlayment
helps with moisture resistance, insulation, and soundproofing.
Step 4: Plan Your Layout
- Measure
the room and calculate the number of rows.
- Avoid
having very narrow planks at the edges; adjust your starting row if
needed.
- Lay
planks in the direction of natural light for the best appearance.
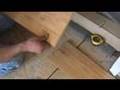
Step 5: Lay the First Row
- Place
spacers along the walls to allow for expansion gaps (usually 1/4 inch).
- Lay
the first plank with the tongue side facing the wall.
- Connect
the next plank by inserting it at an angle and snapping it down.
Step 6: Continue with Next Rows
- Stagger
the seams by starting each row with a plank at least 12 inches shorter
or longer than the previous row.
- Use
the tapping block and pull bar to snugly connect planks.
Step 7: Cut to Fit
- Use a laminate
cutter or fine-tooth saw to cut planks at the end of each row.
- Be
sure to measure accurately and mark your cuts carefully.
Step 8: Install the Final Row
- Use a
pull bar to tighten the last row into place.
- Cut
the planks lengthwise if necessary to fit against the wall while
maintaining the expansion gap.
Step 9: Finishing Touches
- Remove
spacers.
- Install
baseboards or trim to cover expansion gaps (don’t nail into the flooring).
- Clean
the floor and enjoy your new laminate surface!
📊 Benefits of Laminate
Flooring (at a glance)
|
Feature |
Benefit |
|
Easy to Install |
No glue or nails needed (click-lock system) |
|
Budget-Friendly |
Affordable compared to hardwood |
|
Durable & Scratch-Resistant |
Great for high-traffic areas |
|
Variety of Styles |
Mimics wood, stone, and tile |
|
Easy Maintenance |
Just sweep and mop regularly |
Kuwait bus routes and numbers, bus route kuwait CityBus, KPTC, KGL Mowsalat. find Kuwait’s public transport Muscat خط الحافلات الكويت.
🧠 Pro Tips
- Always
keep extra planks in case of future repairs.
- Use moisture
barriers for installations on concrete.
- Never
install laminate in wet areas (unless waterproof-rated).
❓ Top FAQs About Installing
Laminate Flooring
|
Question |
Answer |
|
Can laminate be installed over tile or vinyl? |
Yes, if the surface is flat and dry. |
|
Do I need to glue laminate flooring? |
No, most modern laminate uses click-lock installation. |
|
Is underlayment necessary? |
Yes, unless the flooring already has it pre-attached. |
|
Can I install laminate in kitchens or bathrooms? |
Only if it’s water-resistant or waterproof laminate. |
|
How long does it take to install? |
Typically 1–2 days depending on room size and complexity. |
Visit for More Forever Living Products - Forever Living Kuwait at https://foreverlivingkuwait.blogspot.com/
install laminate flooring, how to lay laminate flooring, DIY
flooring installation, laminate floor step by step, laminate click lock
install, laminate underlayment, best way to install
#LaminateFlooring, #DIYHome, #FlooringTips,
#HomeImprovement, #InteriorDesign, #EasyFloorInstall, #HomeProjects,
#FlooringGuide
Installing laminate flooring is one of the best DIY home
upgrades you can do on a budget. With just a few tools and a little
patience, you can transform any room into a clean, modern space.
.jpg)


